
DVD-quality lessons (including tabs/sheet music) available for immediate viewing on any device.
Take your playing to the next level with the help of a local or online banjo teacher.
Weekly newsletter includes free lessons, favorite member content, banjo news and more.
Premier Sponsors





|
Please note this is an archived topic, so it is locked and unable to be replied to. You may, however, start a new topic and refer to this topic with a link: http://www.banjohangout.org/archive/173153/4
Page: 1 2 3 4 5 6 7 8 9 10 11 12 13 14 15 16 17 18
Banjowen - Posted - 03/31/2010: 07:48:53
Mmmm? now there's two "Just Bill's" on the HO.....confusing? 
Jim D - Posted - 03/31/2010: 08:18:18
quote:One of them is "Just Bill", while the other is "justbill".
Originally posted by Banjowen
Mmmm? now there's two "Just Bill's" on the HO.....confusing?
Viper - Posted - 03/31/2010: 08:45:03
quote:
Originally posted by justbill
Please be kind if this is a really dumb question, but I was wondering if it would be possible to scale up the size of the head and make a "mountain cello banjo".
Solo - Posted - 03/31/2010: 09:34:31
quote:
Originally posted by justbill
Please be kind if this is a really dumb question, but I was wondering if it would be possible to scale up the size of the head and make a "mountain cello banjo".
rudy - Posted - 03/31/2010: 09:50:54
Banjowen,
The hangout computron won't allow multiple handles. One is "just bill" and one is "justbill". Confusing? Yes!
Whichever Bill you are,
Scale up to make Mountain Cello banjo? I don't see why not, if that trips your trigger.
rustman,
I'd suggest 24" scale as a real comfortable scale for a fretless. What print are you working from?
Mountainbanjo,
It's looking great! I had to go back to the first post to refresh myself what this was all about. Great thread so far with only minor sidetracking, and all of that related to the topic. Not bad!
MountainBanjo - Posted - 03/31/2010: 11:44:34
Its my finest thread Rudy-me, Mountainbanjo, my mountain banjo(s), my dog who (not coincidentally) is named "Mountain Banjo", and all the other mountain banjos too! I hope it keeps going a few years. I know I'm already excited about starting my 3rd and I havent even played my 2nd yet. I'm already thinking how ugly guitar tuners are going to look on this one after making a nicer peghead, and thinking I'll have to get a reamer/shaper now too...
rustman - Posted - 03/31/2010: 22:59:07
rudy:
If I'm right, I'm working on the base of plate 173, or something. I had to transfer the inches to centimeters to fully understand the measures. If I remember right, the plan suggests the bridge to be at the middle of the head, which I don't think is the best place for the bridge. In order to move the bridge to more "normal" place I need to shorten the scale a little. If I wouldn't put the flush frets I could place the bridge wherever I want and it wouldn't matter.
Edit: 24" sounds reasonable. At the moment the scale would have been close 27".
Edited by - rustman on 03/31/2010 23:46:43
MountainBanjo - Posted - 03/31/2010: 23:49:44
I think you will get much better tone putting the bridge near the center, Rustman. Remember these are small heads. Putting it toward the tailpiece may really thin out the sound.
After several snafus I'm on track to possibly finish tomorrow. I drilled the holes for my guitar tuners before they arrived and found out there wasnt enough clearance for the buttons. So I took the Grover planetary off my Goodtime (whose stock tuners are on my first mountain banjo) and will use those, it will look much nicer now. Then I found out my headstock was too thick for the Grovers and spent an hour sanding it down for lack of a better method. Got my skin installed and its drying as I type. Tomorrow/Friday: attach neck, install 5th string tuner and nut/screw, install strings and bridge ($3 special from Elderly) and play!
rustman - Posted - 04/01/2010: 01:30:46
Thanks for the advice MountainBanjo. Maybe I'll put the banjo together before making the fret marks. That way I'm able to decide the best place for the bridge.
Solo - Posted - 04/01/2010: 08:10:41
quote:
Originally posted by rustman
rudy:
If I'm right, I'm working on the base of plate 173, or something. I had to transfer the inches to centimeters to fully understand the measures. If I remember right, the plan suggests the bridge to be at the middle of the head, which I don't think is the best place for the bridge. In order to move the bridge to more "normal" place I need to shorten the scale a little. If I wouldn't put the flush frets I could place the bridge wherever I want and it wouldn't matter.
Edit: 24" sounds reasonable. At the moment the scale would have been close 27".
Edited by - Solo on 04/01/2010 08:12:31
MountainBanjo - Posted - 04/01/2010: 10:40:07
A mountain banjo is born! 

Its got a couple issues-as I was afraid might happen the flashing pulled away from the edges a bit as the skin shrank, but its of no big consequence. I used two layers of flashing but would use 3 or 4 next time. I didnt have much choice since I made the head 7" and they dont make 7" stove pipe. My 5th string tuner is crooked but thats an easy fix, the others just need to be rotated. But its up and playing and sounds 50% better than the first one. I learned a lot. I made a good nut on the first try and the action is very reasonable. It plays very well. No buzzes, it looks rough and rustic but better than #1. Number 3 will no doubt be better yet...
Its not completely done yet but I couldnt resist posting pics now...I still have to add some screws and do some more neck shaping but its completely playable and sounding great..
Edited by - MountainBanjo on 04/01/2010 10:42:12
rustman - Posted - 04/01/2010: 12:41:13
Thanks Solo for your thorough explanation. After taking care of my guitars' intonation for over 30 years and after building over 20 fretted and unfretted instruments I'm well aware of harmonics, but I wasn't worrying about that.
If placing the bridge in the middle of the head amplifies lower frequences otherwise missed, I will go for it. With fretless instrument you can actually place you bridge anywhere and still be able to play if you have no fret marks on the neck. You just compensate places of your left hand fingers to relate the tuning while you play. Still, comparing the banjo to a drum, if you hit a drum at the middle of the head the soundwaves hit the rim and bounce back identically from around the rim making the sound dull and lacking "clarity" or "the sound" (something to do with the frequences getting out of phase and and ending up cancelling certain frequences). Normally you wouldn't hit a drum precisely at the middle of the head but slightly off center (the drummers I know would, that is). So, if I put the banjo together before making flush fret marks I can compare the sound on different bridge positions. After I find the ideal place for the bridge I know my exact scale length and can count the place for the 12th fret mark. There are fret calculators in the internet, which help.
Edit: This means , that the place of the fifth string tuner cannot be placed before I know the scale length and exact position.
I'm new with the banjo and this is by first banjo built, so forgive me my stubborness. I'm just anxious to find out "why".
With kind regards,
Edited by - rustman on 04/01/2010 12:46:02
Solo - Posted - 04/01/2010: 15:34:14
quote:
Originally posted by rustman
Thanks Solo for your thorough explanation. After taking care of my guitars' intonation for over 30 years and after building over 20 fretted and unfretted instruments I'm well aware of harmonics, but I wasn't worrying about that.
If placing the bridge in the middle of the head amplifies lower frequences otherwise missed, I will go for it. With fretless instrument you can actually place you bridge anywhere and still be able to play if you have no fret marks on the neck. You just compensate places of your left hand fingers to relate the tuning while you play. Still, comparing the banjo to a drum, if you hit a drum at the middle of the head the soundwaves hit the rim and bounce back identically from around the rim making the sound dull and lacking "clarity" or "the sound" (something to do with the frequences getting out of phase and and ending up cancelling certain frequences). Normally you wouldn't hit a drum precisely at the middle of the head but slightly off center (the drummers I know would, that is). So, if I put the banjo together before making flush fret marks I can compare the sound on different bridge positions. After I find the ideal place for the bridge I know my exact scale length and can count the place for the 12th fret mark. There are fret calculators in the internet, which help.
Edit: This means , that the place of the fifth string tuner cannot be placed before I know the scale length and exact position.
I'm new with the banjo and this is by first banjo built, so forgive me my stubborness. I'm just anxious to find out "why".
With kind regards,
teebee - Posted - 04/01/2010: 18:36:19
Fret markers are easy to put in. Make saw kerfs and glue a small piece of wood or plastic into the groove. It can be contrasting or not. The fretting will be according to where you put the pad of your fingers and that is wherever it sounds good to you. So even though your strings are not in tune, you can play in tune. Making five long strings, I refer to this as a five string plectrum, really works well and simplifys tuning and playing. Using a really light .008 string for the fifth, isn't too tight in my book. I find it easier to play around the 3rd fret when there isn't a 5th string tuner in the way. I have two fretted banjos set up with the long 5th string and plan on making a similar fretless next. It's warm in the toolshed again!
I enjoy playing Diller's version of Sandy Boys on the 5-string plectrum.
rudy - Posted - 04/01/2010: 19:39:47
rustman,
I've played around with bridge position on unfretted mountain banjos and found the tone is always noticibly fuller with increased bass when the bridge is slightly (1/2" - 3/4") behind the head's center.
I've also checked this on my standard size fretless jos and found the results to be consistantly better when slightly off center.
I also like to position the fifth string peg up at the sixth fret to facilitate easy slides on the fourth string to the fifth fret. When the peg is at the regular fifth fret location it tends to get in the way of slides to the fifth fret, which I make use of pretty often. Don't do this if you're going to be "noting" the fifth string, however.
Edited by - rudy on 04/01/2010 19:58:13
rudy - Posted - 04/01/2010: 20:01:28
Nice job, Mountainbanjo. It looks good.
quote:
Its got a couple issues


Edited by - rudy on 04/01/2010 20:14:42
Solo - Posted - 04/01/2010: 21:13:24
quote:
Originally posted by teebee
I enjoy playing Diller's version of Sandy Boys on the 5-string plectrum.
Bisbonian - Posted - 04/02/2010: 07:22:54
Nice banjo, MountainBanjo! really love that grain pattern on the back of the pot. The 7" pot looks interesting, too.
This is how I have made my metal "tonerings", where you used flashing. The metal is aluminum strip, from the hardware store. It's 1 1/2" wide, about 1/16" thick, and comes in three foot lengths. Inch and a half seems to be the perfect width...fits inside a pot with a 1" center ring and 1/2" thick top. Since it comes as a strip, and you rivet it together, it would be easy to make the ring any diameter you want. I make a form to bend it around:
The form has a recess to put in a patch across the joint, then I drill holes through the ring and patch (into the form), and rivet it together:
For the next one :) , it might be a sturdier solution than the flashing.
I agree with rudy, a little bit south of the center is really the best place for the bridge. Fiddle around with it until you get the best tone. And, like rudy, I am befuddled with how your fifth string tuner moved across the neck like that?
More detail in another thread, but I took one of these banjos to a local bluegrass jam last night, and since the regular banjo player wasn't there, I filled in with my fretless mountain banjo, frailing away as loud and fast as I could, and fit right in. It had plenty of volume if I really laid into it.
Edited by - Bisbonian on 04/02/2010 07:33:23
rustman - Posted - 04/02/2010: 10:29:51
solo: Flush frets are not hard to do at all. Just follow the teebees advice. I've done this on couple of cigar box guitars. Remember to shave the fret marker strips properly even with the fretboard.
Rudy, thanks for your info about the bridge placement. Just as I thought.
Solo - Posted - 04/02/2010: 11:18:51
I have everything pretty well done, but now have the walnut neck wood staring at me mockingly. Looks like time for a band saw. What are your experiences? I've been reading some poor reviews of 9" and 10" benchtop models, but this sure would be handy. Are there benchtop models which would hold up?
MountainBanjo - Posted - 04/02/2010: 11:38:33
Haha, I was wondering what you were talking about. If you look at the guitar stand its also flipped-I guess I pushed the wrong invert button on my camera...
Thanks for the info on your rims/rings, I was going to ask about how you made them. I recall from some of your pictures that it looked like wood, but I didnt want t go back and read through 7 pages.
Anyway my head issues are totally fixable, I can resoak the head and insert a circular block of wood while it dries this time so it keeps its shape, but I probably wont. I'll do something different on the next one instead.
MountainBanjo - Posted - 04/02/2010: 11:45:58
Oh and that dog is hilarious!
Solo, I have a 9" Pro-Tech bandsaw that I bought for $99 years ago. I have built 5 kayaks and 2 banjos and countless other minor projects using it. I love mine. My local instrument repair guy has an identical one and says the same thing. They arent super heavy duty but I have ripped 16 foot boards and cut through 4" of hardwood on my latest glued up peghead. That was pushing it, but it worked. If you keep a sharp blade and go slow it works pretty good.
Solo - Posted - 04/02/2010: 13:12:49
MountainBanjo, I remember looking up Pro-Tech when you mentioned the brand, and couldn't find anything listed online. I'll bet that their product line was bought out and re-branded, but that's the kind of potential I would be happy with.
What sized blades work well for you?
Btw, your new banjo looks great. I ordered a thin calf skin head, and I'm guessing you did as well. Did you apply veneer to your peghead? Are those friction tuners like Grover Sta-tites? Are they holding?
For this banjo I'm abandoning the idea of violin pegs, but I'll be looking for a good reamer. I don't believe that the inexpensive reamer I purchased has the required 30:1 taper. The best price so far is from here:
pilgrimsprojects.biz/vtools.html
MountainBanjo - Posted - 04/02/2010: 13:55:26
I cant find anything current on them either. There are some on Craigslist though-mine looks like this one
iowacity.craigslist.org/tls/16...2752.html
I bought mine at Menard's, I dont know what they are replacing them with but maybe they are also decent. Mine takes a 59 1/4 inch blade, and use a 3/8 wide 6 tpi for heavy duty cutting like peghead. It will take 5 sizes down to 1/8 inch and 14 tpi. I should mention again as was mentioned above its easier to cut the peghead slant then glue the ears on but I didn't do that.
Thanks for the link, those are good prices.
My Grovers are planetary and work great. The 5th string is a friction tuner and not so great, but part of that is because I monkeyed around with it when I installed and may have funked it up a bit. But for $9 I cant complain. Yup I used the think calfskin, and it worked great and is almost translucent.
I used black Fiebings Leather Dye (buy at shoe store or shoe repair store) for that authentic ebony veneer look.
Edited by - MountainBanjo on 04/02/2010 14:36:15
Jim D - Posted - 04/02/2010: 14:01:41
Band saws ...I have been carving duck decoys since 1955. I've made over 1,000 of them in that time. A band saw is as important to what I do as strings are to my banjos. So, right or wrong, I have some strongly held opinions on the subject...
1. Most people never learn how to use the band saw they buy. They don't understand adjustment. That causes broken blades, ruined projects, etc. , all of which they blame on the saw. Think of buying a banjo without knowing anything about setup. How many people have you told that they need to tighten the head, or relocate the bridge?
If you own a band saw, get a book on how to use it... I recommend the Band Saw Handbook by Mark Duginske. Get it through your library on interlibrary loan and you won't even have to buy a copy.
2. Most people buy the wrong blades for their purpose. Those 10 teeth per inch blades weren't made for cutting thick stock. The gap between the teeth is the part of the blade that carries off the sawdust and chips. If the gaps are too small, or if there are too few of them (both being the case when you have a lot of teeth per inch), they clog up and burn the wood or cause the blade to wander off course and jam. I cut stock up to 10" thick with a 1/4" X 4 TPI blade. As long as I saw at a sensible speed, I have no problems.
3. The blade cuts the wood. (say that over and over until it sinks in!) Spending a lot of money on a saw and then using cheap blades is like putting junk tires on your Porsche. I'd rather have a mid range saw with a good blade than a great saw with a bad blade. Would you put $0.98 cent strings on your Stelling?
4. When the blade gets dull, replace it or have it re-sharpened! You can fill in your own banjo analogy here.
There are a lot of good saws out there. Many of them get a bad rep from an owner who has violated some or all of the rules above. If I needed a saw now, I'd keep an eye on Craigslist. Buy one from someone who didn't read the book!
YMMV
Edited by - Jim D on 04/02/2010 16:46:22
Solo - Posted - 04/05/2010: 10:03:44
This thread is turning into an impressive pile of information for the budding mountain banjo builder, perhaps of even dwarfing the technical content of Foxfire 3. I'm getting my 1/16" by 1 1/2" aluminum today.
Jim, thanks for the information on the proper use of bandsaws. I've ordered that book by Mark Duginski, and have been watching his Youtube Woodcraft.com videos. Excellent information on resawing. I was fortunate to have a hardwood dealer offering free planing and jointing services, reducing 5/4 walnut stock down to half inch. With a proper bandsaw setup, I could have easily spilt this stock.
youtube.com/watch?v=Xg9JaAckK9o
youtube.com/watch?v=YG1xb9-AL3...e=related
Here's a video on resawing found wood:
youtube.com/watch?v=IUL6FN4bQN...e=related
LarryN - Posted - 04/18/2010: 17:25:55
Just joined the Forum - lots of interesting discussion going on. I built a mountain banjo about 35 years ago - from a kit which was a present from my wife (she has since given up her delusions that I might have some hidden musical talents). I think she found the kit through the now-defunct Whole Earth Catalog. The banjo is oak, fretted, with guitar tuners. The pot (?) is about 10" diameter and the head is about 5-6" (some very thin hide stretched over a wooden hoop). It was a lot of fun to build and didn't require much in the way of tools (good thing - grad students can't afford lots of tools and don't have much place to keep them).
Many years ago one of our dogs knocked it off a shelf and the drum head split. Anyone know of a source for heads or even for an appropriate material to use? (I saw the comment about tanned woodchuck hides - I'm short on woodchucks and wouldn't have a clue how to tan a hide).
Thanks
rudy - Posted - 04/18/2010: 19:37:06
Larry,
Elderly sells raw skin (calf or goat) suitable for banjo heads. I can't offer any info as to how to work with it, as I use standard banjo heads on my mountain banjos.
elderly.com/accessories/cats/BPHC.htm
Solo - Posted - 04/18/2010: 19:45:52
Here's a recipe for preparing your groundhog, perhaps found guilty of menacing your garden, or perhaps your neighbors cat, found guilty of stalking your tufted titmice at the feeder. These instructions are similar to those found in Foxfire 3. It would probably work for that dog responsible for knocking your banjo off the shelf as well, assuming that he lived a long and happy life and died of natural causes. Roy Rogers stuffed Trigger, so I see nothing wrong with a Fido head. If your dog is still alive, he's probably pushing 40 and already in the Guinness record book for longevity. I'm sure that he'd understand you wanting to settle the score, and is probably racked with guilt.
mudcat.org/thread.cfm?threadid=29653
I'm 80% done with my first mountain banjo, started a few weeks ago and inspired by this thread. I purchased a 14" thin calf skin head from Elderly Instruments for $9.00. I scribed this head with an 11" circle using the top rim as a template, and cut it down to a manageable size.
elderly.com/accessories/cats/BPHC.htm
Hopefully your banjo back was assembled with easy to remove wood screws, and you don't have any bungs to remove for access.Once inside, you'll see the builder's method of mounting the head (recalling what you did 35 years ago), most likely you just tacked to the inside of the rim when wet.
timmreck - Posted - 04/22/2010: 16:26:10
Hello. First of all, thanks to everybody for sharing what they know. There has definitely been some very helpful stuff posted on here.
So I've been working out of the foxfire book, and i just have a few random questions about stuff that isn't really covered in there or hasn't been covered in this forum. I hope this post isn't too late in the life of the thread to get noticed..
First set of questions: Do i need a fingerboard if my neck has been carved out of a piece of poplar? in other words, is poplar too soft? Does it make a difference if i use nylon strings or steel? Will i even be able to use steel strings on this plain wood neck? (it's going to be around a 24" scale if that makes a difference)
Second set of questions: does it make any difference in anybody's opinion to use plywood for the head? The reason i ask is because i found a big old piece of 1/2 inch thick plywood. free is good. I also ask because i have very limited wood working skills and i don't know how i would get the typically 3/4" thick solid boards down to the half inch necessary for the top and bottom. I'm guessing the plywood will make little difference in the sound since they're not really soundboards like on guitars. any contrary ideas though?
Third set of questions: would a 5" pot be noticeably different than a more typical 6 or 6 1/2" inch pot? i found an old, old folgers can (this is what got the whole thing going) but it's only 5" in diameter. would i be better off getting something a little bigger?
I've got more questions floating around in my head somewhere, but i think this is plenty for now. Thanks in advance to anybody who takes some time to respond to my questions. i appreciate it.
rudy - Posted - 04/23/2010: 05:43:41
Hi Timmreck,
Welcome to the forum, lots of helpful folks here.
Yes, Poplar is soft. You’ll probably be OK using nylon strings, but steel strings will definitely form indentations in the finger board.
If your finger board were made of a more durable material the question of steel vs. synthetic strings might be more applicable. Nylon strings are always more appropriate on a mountain banjo, as the resultant sound and feel are part of what you’re going after with a mountain banjo. The other thing that would make steel strings a poor choice would be the type of tuners used. If you go with traditional style friction violin pegs then it would become extremely difficult to bring your strings to pitch and have them hold reliably. They would also require too much tension for a Poplar neck. Whenever you build a banjo of any type it’s best to consider all of the factors involved when doing the initial design work.
“Plywood for the head? “Would a 5 inch pot be noticeably different?”
The head would be the very thin membrane type of material that the string vibration is transferred to via the bridge. Its purpose is to efficiently couple the string vibrations to the surrounding air to “amplify” the sound.
If you’re asking about making the body (pot) from plywood, then yes, it would be acceptable without changing the sound noticeably.
The 5 inch portion that you refer to would be the “head”. You could get away with the smaller size, but a larger size will produce more volume with a better bass response.
Many things will more or less work for you, and the important thing is to get your feet wet in the building process and enjoy the fruits of your labor. The part where you ask yourself “What was I thinking when I did that?” will come along later!
Bisbonian - Posted - 04/24/2010: 11:17:19
timmreck, while rudy has correctly pointed out that a half inch plywood top (and/or bottom) part to the rim would work just fine, I would also like to point out that typical 3/4" thick 'one by...' material works fine, as well. I have built two of these banjo rims out of three layers of 3/4" thick material, instead of 1/2" top and bottom and 1" center rim. Works out pretty much the same.
MountainBanjo - Posted - 04/25/2010: 18:17:38
You can also get a power hand planer for $40 or so, or do it with a manual hand plane. Plane with the grain. On my latest one I used my friends bench planer and all I can say is wow. WOW. I gotta get one of those. But they are about $200 or more. Took about 3 minutes to plane top and back.
Edited by - MountainBanjo on 04/25/2010 18:18:30
Bisbonian - Posted - 04/26/2010: 13:28:31
Yeah, I have a bench planer, too, but it a) scares the snot out of me, b) leaves snipe, c) leaves tearout on walnut with any curl. That's why I did a couple with 3/4" top and bottom plates. For a first-timer, I think it's a good way to go. Since then, I've gotten a Safe-T-Planer, and it does a good job, but I think a good handplane is really the way I want to go in the future.
timmreck - Posted - 04/26/2010: 15:48:53
Hey thanks everybody for chiming in. Since i asked those questions, many things have sorted themselves out.
I ended up finding a perfect metal ring by way of a giant can of diced red bell peppers. It turns out most commercial (restaurant) canned foods come in big cans about 6 inches in diameter. very easy to find.
While browsing the lumber yard, i stumbled upon some poplar boards that were 8" x 1/2" thick. I was happy i found them. I had a time of it laminating them together because the boards were slightly warped, but it worked! I also found a 11"x11"x1" piece of fir for the middle ring and it looks really nice sandwiched between the poplar. Now everything is cut out and rasped to size. only sand-papering remains. if i make another one of these though, i'm definitely taking bisbonian's advice and just using 3/4" wood.
my calf-skin and violin pegs came in the mail today so all that remains to acquire/make are the nut, bridge, and tailpiece.
so that leads me to another set of questions...
how have you all tackled the issue of getting the peg-holes perfectly reamed to size? do you have the expensive violin peg reamer? If not, any tips? Do i need to do anything with the violin pegs to prep them or anything? (they came from the internet... elderly)
do you all make your own nuts and bridges? If so, do i absolutely need something really hard (for the nut) like ebony or bone or plastic if i'm using nylon strings? and for the top part of the bridge? any tips for trying to make these myself? How about making the slots for the strings on both the nut and the bridge? are specialized tools really necessary?
thanks again for sharing your collective knowledge!
MountainBanjo - Posted - 04/27/2010: 23:33:44
I make my own nuts though I'm not good at it yet. My first was ebony, and I used steel strings. It was an awful ugly mess but it worked. Then I made a bone nut and had it fine tuned by my local guitar tech. i watched him and then made the bone nut on my latest banjo myself and it came out better. All I did was lightly score the nut with a (cant remember what you call it, but its like a minature dovetail saw). I may have fine tuned it a bit with torch files. 3 of the 4 strings sound great, one has a minor issue. I'm not sure its due to the nut but it could be. Again I do everything pretty half-assed and crudely because I'm lazy and impatient, and somebody else can tell you how to do it far better than I.
I buy $3 maple-ebony bridges from Elderly.
Edited by - MountainBanjo on 04/27/2010 23:35:00
Bisbonian - Posted - 04/28/2010: 23:24:26
It's hard to beat a three dollar bridge...but I make my own from scraps of walnut. I mostly use a belt sander, believe it or not. Just sand away everything that doesn't look like a bridge. And then a file to fine tune everything, and a little knife-edged sort of needle file to make the slots. I use it on the nut, too. I've made nuts of bone, rosewood, purpleheart, and recently, ebony. I got a brick sized chunk of ebony that's going to last me a very long time. I've learned a lot from browsing the Stewart MacDonald catalog...they show you how all their nifty tools are supposed to be used, and even have links to online videos. Sometimes I even buy a tool!
I tapered the peg holes on my first gourd banjo with a rat tailed file. It worked! I could do it again if I had to...just find a file with a taper like your pegs, drill the holes a little undersized, and use the file in a twisting motion. But I got one of those nice reamers from Stew-Mac, and love it. And I got a used one on eBay for a lot cheaper, and cut it down to be a specialized fifth string reamer. I bought fiddle pegs the first time around, and hand made my own on the second. By the fourth, I had another Stew-Mac tool, a sort of fancy pencil sharpener that puts the propper taper on the pegs. I carve the rest out, mostly with a rasp, from other leftover walnut scraps. I just managed to saw TEN out of a 3x4x3/4" piece of walnut, with some careful band-sawing!
Five of them are now installed on the banjo I finished today. It's the one with the anchor soundhole. Thanks, rudy, for the advice. I went ahead and reinforced the wooden peninsulas with some inlaid strips across the grain...ought to keep it nice and strong. Here is a picture before I put the head on:
Ack! Tinypic is dead! Well, pictures later. Here is a video of the completed banjo: youtube.com/watch?v=PdUyPCfCVrM
Edited by - Bisbonian on 04/28/2010 23:32:48
teebee - Posted - 04/29/2010: 04:29:23
Mighty fine work on the banjo and good sound. Thanks for sharing.
Bisbonian - Posted - 04/29/2010: 07:02:00
Thanks teebee. Tinypic is working this morning, so here is the promised photo of the inside, showing the cross-grain supports:
And from the back:
And with skin:
devoall - Posted - 04/29/2010: 10:40:28
Hey Bisbonian. That new Anchor banjo sounds GREAT!
Keep up the good work, and keep posting it on here. It's a real inspiration. I just got some REALLY small shop space, so in a month or so I should be up and running and I wanna try and build one of these first. I'm excited!
Solo - Posted - 04/29/2010: 15:05:03
quote:
Originally posted by MountainBanjo
I make my own nuts though I'm not good at it yet. My first was ebony, and I used steel strings. It was an awful ugly mess but it worked. Then I made a bone nut and had it fine tuned by my local guitar tech. i watched him and then made the bone nut on my latest banjo myself and it came out better. All I did was lightly score the nut with a (cant remember what you call it, but its like a minature dovetail saw). I may have fine tuned it a bit with torch files. 3 of the 4 strings sound great, one has a minor issue. I'm not sure its due to the nut but it could be. Again I do everything pretty half-assed and crudely because I'm lazy and impatient, and somebody else can tell you how to do it far better than I.
I buy $3 maple-ebony bridges from Elderly.

Edited by - Solo on 04/29/2010 17:36:08
rudy - Posted - 04/29/2010: 17:43:50
timmreck,
As far as peg hole reaming, it’s probably best to purchase a good reamer if you want really good results. I purchased mine from International Violin Supply a few years ago when they had a sale on reamers and I think it was around $20. It was “middle-of-the-road” quality, but has served me well. I went ahead and bought two and cut one off to use as a fifth peg reamer. I’m kind of shocked when I see the current prices on these. So, keep your eyes peeled and bite the bullet if you’re going to do a lot of this. Otherwise, there are alternatives to using a commercial reamer I’ve seen related on this site in the past. Careful use of the search function should yield some acceptable results. You can probably be fairly certain that there were no commercial reamers used back up the hollows in eastern Tennessee.
“Proper” procedure for the peg would be to use a peg shaver to make certain the peg was exactly the size and taper desired, but in reality it’s not necessary on the low tension of a low tuned nylon strung instrument. If you have a peg shaver, by all means use it. It can also be used to produce an undersize wooden reamer that can be wrapped with course sandpaper to taper the hole in a pinch.
Ebony scrap makes wonderful nut material, although any hardwood could be used. Saw the slots with a fine tooth back saw. Hobby backsaws like those produced by X-acto could be pressed into service here. Refine the nut slots by folding an appropriate number of pieces of 22o grit sandpaper over the back saw blade to enlarge and round the slot bottom. This works great for all nut materials.
Bridge slots can be made in much the same way, I like to slot mine lightly, then angle down toward the tailpiece with the top of the angled slot just breaking over the bridge center. You’re always shooting for a nice clean edge to serve as the vibrational starting point for the string. This minimizes the chance for string rattles and buzzes.
I like to use a three piece laminated glue-up for my bridges with quarter sawn maple facing a thin center of ebony. I make the bridge stock up with wider foot area which tapers to about 3/32" for the entire center of the bridge. I make this up 3/4" high, and because of the way the sandwich is made it can be trimmed to any desired height. It's pretty much universally accepted that nylon strung banjos should be fitted with a two-footed bridge. I'm not sure of the science behind it, but most swear by it.
rudy - Posted - 04/29/2010: 17:48:44
Solo,
Nice work. You should be able to lower your nut slots so there is only the thickness of a business card between the string and the finger board. Intonation will greatly improve and you'll make that jo play like butter!
A note to new and prospective builders:
Make sure you use plenty of peg head back angle on this style of banjo so you'll have sufficient break angle over the nut to assure good solid contact to minimise any chance of the string buzzing in the nut slot.
Fifteen degrees is acceptable, but twenty degrees is probably better if you're not using a separate glued on fret board. It's best to draw a full size profile including the tuners that you'll be using to check for good string breakover angle.
Edited by - rudy on 04/29/2010 17:56:14
Solo - Posted - 04/29/2010: 18:44:18
Thanks Rudy, I was unclear about this. I didn't glue in the nut yet with the intention of seeing how far I can lower the action. Next time I'll cut the peghead at a greater angle to the neck, and perhaps reflex the neck another degree.
Interestingly, I installed the strings as I was mounting the neck to the pot assembly and then felt inclined to perform a moderate neck reset, which turned into major surgery. The neck is reflexed back a degree or two, with a great improvement in action and bridge pressure.
I'm happy with the way my tailpiece is working out. I wanted it as low slung as possible to apply pressure on the bridge. I used the 1/16" x 1 1/2" aluminum bar stock used for the "tone ring", and applied a veneer of walnut beneath the holes for the strings, keeping the aluminum from sawing through the nylguts.
rudy - Posted - 04/29/2010: 20:01:30
Solo,
It takes getting a few under your belt so to speak to really understand the geometry involved.
Your tailpiece solution is a good idea; I applied much the same idea on a fretless recently. The tailpiece has 1/16" ebony above and below the stainless adjustable downforce tailpiece to prevent the strings from being cut and to function as a tie block on the top surface in the same manner as a classical guitar tie block.
Jonnycake White - Posted - 04/30/2010: 12:18:24
You can use one of those needle files (the round one) to file the edges of the holes in your tailpieces to keep them from cutting the nylon strings.
Here is another type of tailpiece. This is made from brass folded over a brass rod and soldered. The design is etched but that's not necessary of course.
Edited by - Jonnycake White on 04/30/2010 12:21:11
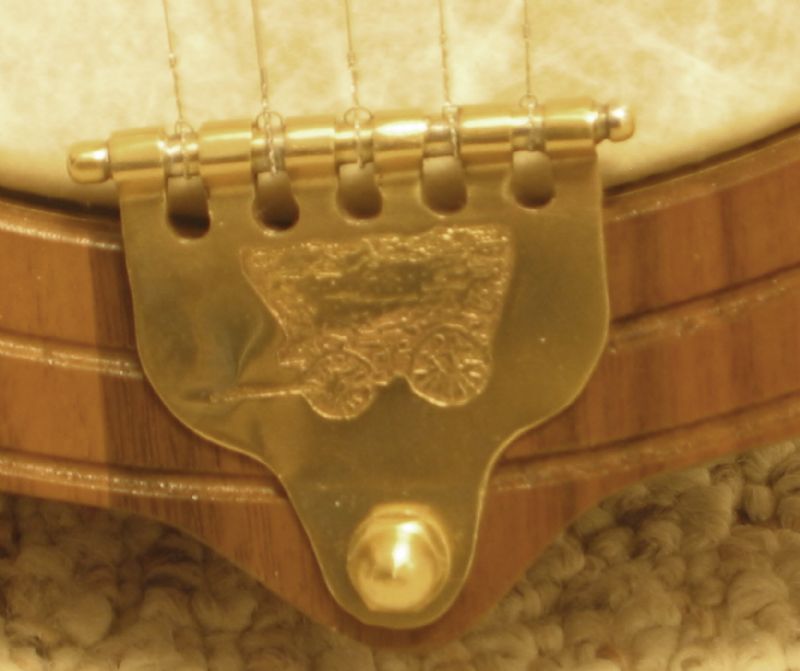 |
rustman - Posted - 05/01/2010: 02:46:17
Awesome instruments! I'm at the stage when I need to decide how to make the tailpiece. I'd like to make it from ebony. The pictures shown here are made from metal. Do you have pictures of wooden tailpieces?
rustman - Posted - 05/01/2010: 09:34:31
Thanks Rudy!
Basically, yes, but my rim is much wider than yours (like in Solo's pic) and I want a proper pressure to the bridge. This way it would be too far from the top hole and the head (in my case). If I remember right, someone had his tailpiece screwed to the top rim. I've also seen violin type tailpieces but that wouldn't add much pressure, either.
Terms of Use | Privacy Policy | Privacy Consent (EU/GDPR Only)
Copyright 2026 Banjo Hangout. All Rights Reserved.


