
DVD-quality lessons (including tabs/sheet music) available for immediate viewing on any device.
Take your playing to the next level with the help of a local or online banjo teacher.
Weekly newsletter includes free lessons, favorite member content, banjo news and more.
Premier Sponsors





|
Please note this is an archived topic, so it is locked and unable to be replied to. You may, however, start a new topic and refer to this topic with a link: http://www.banjohangout.org/archive/173153/6
Page: 1 2 3 4 5 6 7 8 9 10 11 12 13 14 15 16 17 18
GSCarson - Posted - 06/21/2010: 08:24:43
Don't know how I missed this thread, some really great banjos here. I love these. I bought Foxfire 3 when it was first published in 1975 and was just immediately driven to build one of these (Stanley Hicks version), even though I knew nothing about the banjo or music. I bought my rough lumber (maple, walnut and birch) from a fellow who had listed it in the local newspaper, turned out to be George Orthy, the autoharp maker but then into dulcimers. George became a lifelong friend, and I met Bob Buckingham when I walked into the local music to store to buy strings for it, he became my oldest music buddy. Bob inspired me to learn fiddle, banjo, guitar and we had all kinds of musical adventures which still continue to this day (as recently as last Sat night!).
I had no tools when making the first one, bought a coping saw, my grandads old hand saw, hand plane, a hand drill, pocket knife, and some rasps and files. Building that little banjo sure enriched my life.
Glenn C.
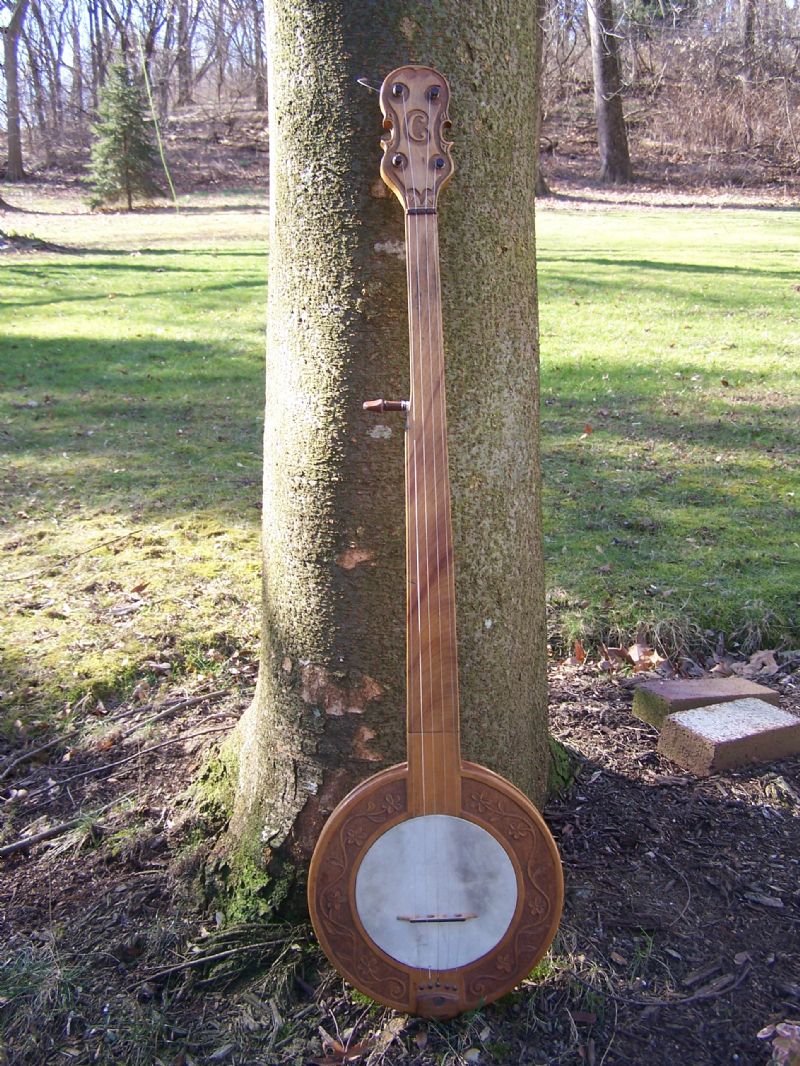 First banjo I made - 1975/76 | 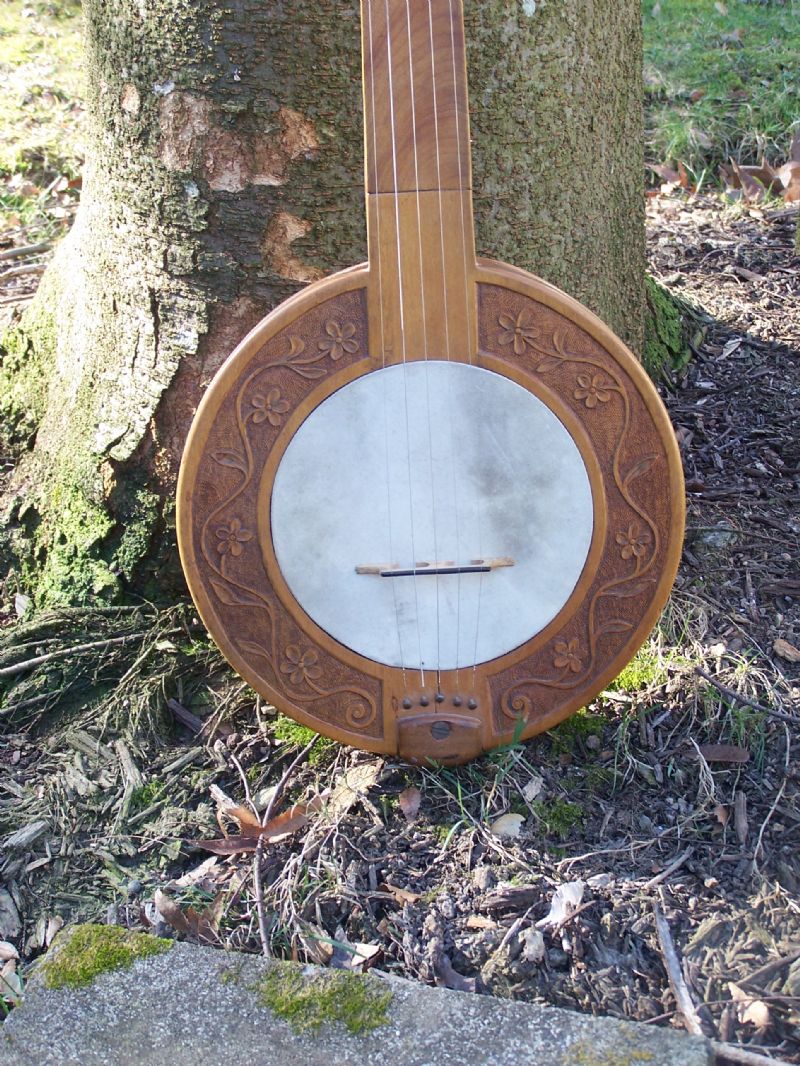 First banjo |
StPeteNick - Posted - 06/21/2010: 20:29:23
GSCarson
Sweet work, i would give it 5 stars.
Is there any chance of an mp3 being posted?
Nick
rudy - Posted - 06/23/2010: 05:55:41
Glenn,
Your example proves that a mountain can go beyond function and be propelled into a thing of beauty. Really beautiful carving work.
Anyone who wishes to see more of Glenn's carving skills should visit his homepage photos:
banjohangout.org/myhangout/pho...umid=4598
Edited by - rudy on 06/23/2010 05:58:21
GSCarson - Posted - 06/23/2010: 06:46:49
Thanks Nick and Rudy! That was my first banjo building and first wood carving effort, haven't been able to stop doing either since!
That banjo mostly hangs on the wall these days Nick, but I'll take it down and record something on it, I'll have to refresh my fretless playing a little. Its also the banjo I learned to play clawhammer on, so it brings back some good memories just thinking about it.
Glenn
Almost forgot, I'll have to dig out the old Foxfire book and take a look, but I think there was another banjo in there that kind of inspired the carving on mine, possibly one of Dave Sturgills? No internet back then, and those mountain banjos in the Foxfire articles were the first ones I had ever really checked out. Seeing all the neat fretless banjos in this thread makes me want to build another one...
Edited by - GSCarson on 06/23/2010 06:51:08
Bisbonian - Posted - 06/27/2010: 18:40:28
Making progress on a few of my own. I really like the sound of the wooden tone rings, so I have several in the works right now:
First one is walnut...don't recommend it. It was an experiment. No tone. Sounds like balsa wood! Maybe I made it too thin.
Second is maple. Great tone when I knock it. It goes in a maple necked banjo that I originally built with an aluminum-strip tone ring, but when he heard one of my wooden ones, he wanted a retro-fit.
Third is Jatoba, for the Jatoba banjo. Fantastic tone. Chips, splinters, extremely hard, heavy. Pretty, though. I'm coming to terms with it, but doubt I will make another one.
Fourth and fifth Purpleheart. It's like a megaphone for a mountain banjo...love the stuff. Hard, but not so splintery or heavy, and not too awful hard to work. Sounds great. The last one is extra thick, also as an experiment. The guy plays in a band, and we're trying to see if he can get by without a pickup.
On the banjo. I know he can't live without his pickup.
They are all 6" diameter...the walnut one is 1/4" thick (too thin), all the others are 3/8" thick, except the last, which is about 7/16".
Edited by - Bisbonian on 06/27/2010 18:43:34
StPeteNick - Posted - 08/07/2010: 20:02:19
Sweet work Bisbonian. The grain on the center banjo is particularly nice.
Nick
Edited by - StPeteNick on 08/07/2010 20:07:25
rudy - Posted - 08/18/2010: 04:49:37
Here's a new Cherry top tension mountain banjo I just finished up. It features 24" scale, 11" pot with 9" Renaissance head, top tension design, wood tone ring, Ebony pegs and fittings, mother of pearl inlay and position markers, flush fret scooped finger board, Nylgut Classical strings, combination block/laminate rim with contrasting trim, Wenge rear rim cap. Notice the fifth string peg has two holes to lock the string in place.
Here are a few more photos.
Edited by - rudy on 09/28/2010 19:06:35
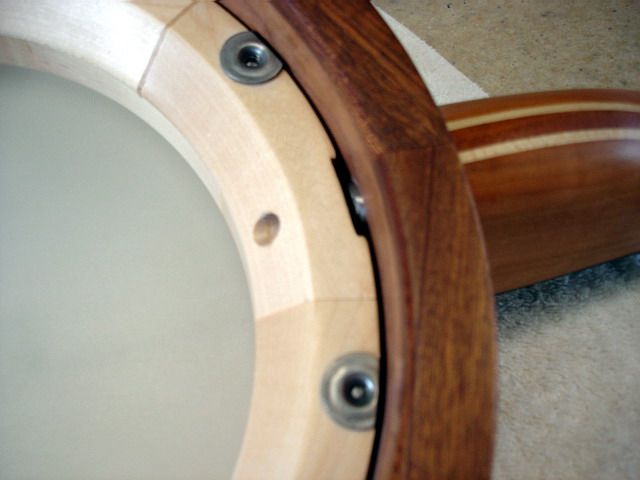 Tone / Tension ring | 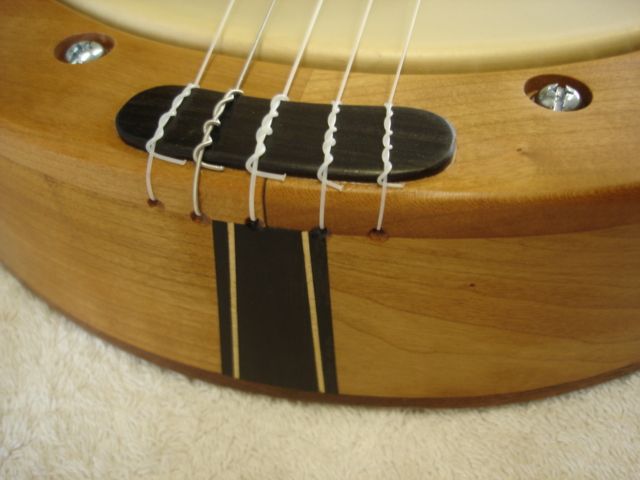 Tailpiece | 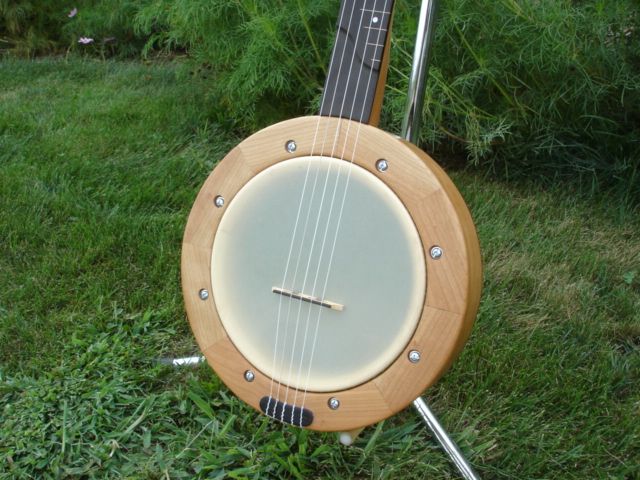 Pot View | 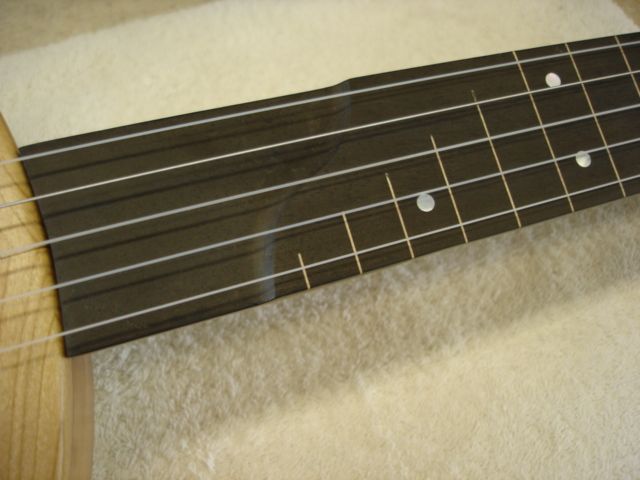 Scoop |
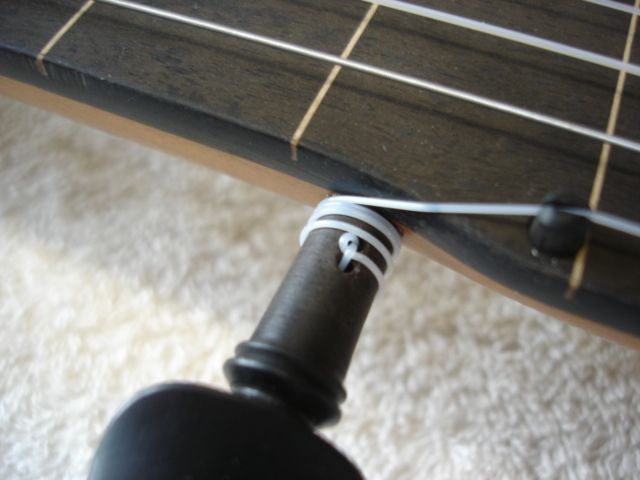 Fifth Peg | 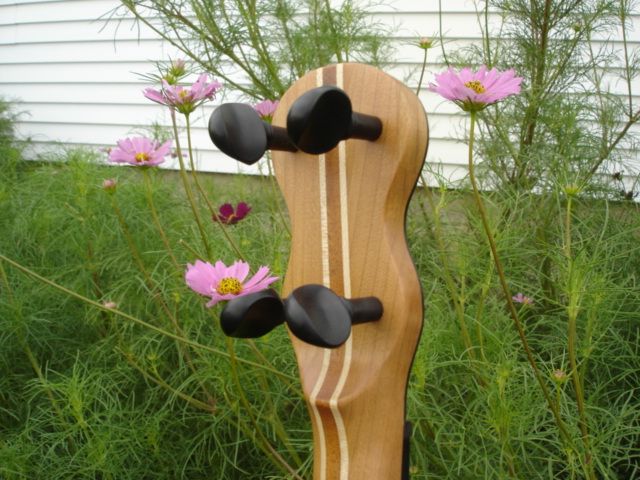 Peg Head Rear | 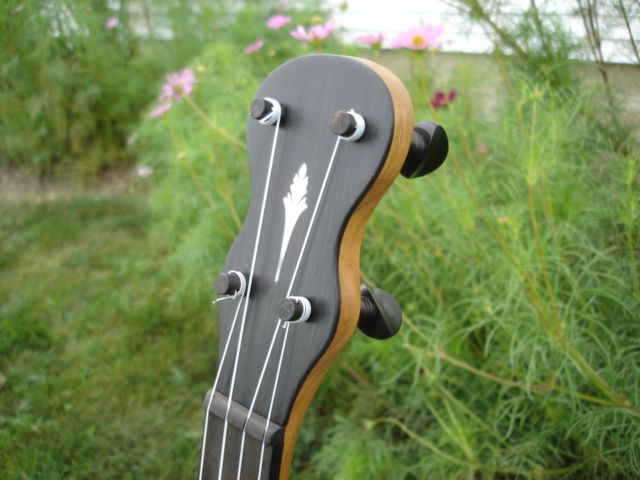 Peg Head Front |
teebee - Posted - 08/18/2010: 06:26:12
That's a beautiful work of art. Real craftsmansip. Thanks for sharing.
Crowman - Posted - 08/29/2010: 10:55:07
Man this thread has really come along since I got on here the last time. Makes me one to build my first one again. Rudy that banjo is a work of art, and the top tension design is new to me, would like to research that myself.
Bis you also have some very nice banjos, the 2nd one and 3rd are my favorites. I did get around to finally getting a bandsaw and some walnut stock but havent got started on mine yet. Still pretty hot here in NC so when it cools down a little more I probably will get started. I have to build a stand for my bandsaw as I have it in my Dads utility room and its on the floor right now and makes it rough to use. I had to end up moving in with Dad to continue taking care of him. He is still taking chemo and doing ok right now, hes had a rough road so far and has more to go. Ron thanks for the prayers as it is appreciated here. I lost Mom to lung cancer in 03 and now Dad has it also. I have not been playing any as its not easy to do that as I dont want to bother Dad. But guys I aint giving up on this mountain banjo or in learning to play. I will try to check in more now that things have calmed down somewhat. Thanks for keeping the thread going and all the good pictures and advice will help.
Crowman
Crowman - Posted - 08/29/2010: 11:02:16
GSCarlson forgot to mention that your first banjo is very impressive, never seen one with carving and its beautiful work. Are you still building mountain banjos today?
Thanks
Crowman
GSCarson - Posted - 08/29/2010: 14:27:53
Crowman, sorry to hear about your dad and hope he pulls through, value your time with him. Thanks for your comment. I haven't made any mountain style banjos since the 70's, but have been thinking about making another one sometime soon. I got into fretted banjos, made some bluegrass banjos, fancy tenors, and than settled in making openbacks more the most part. I have a few photos of some on my pages. Still love those little banjos and this thread really got me thinking about them, there are some really great banjos on here.
Almost forgot, my wife just got me a new recorder (mine had died), so I'll try to play on tune on my first banjo and post it, I am a very rusty fretless player....
Glenn C.
Edited by - GSCarson on 08/29/2010 14:29:40
LarryN - Posted - 08/30/2010: 08:25:01
A while back, I got some help from folks on the Forum about how to replace the head on a banjo I built from a kit in 1976 (including some instructions on how to prepare a woodchuck hide). I purchased a piece of goat hide from Elderly Instruments (I believe the kit may have come from them since we were living in East Lansing, MI, at the time), and finally got it on the ring and into the banjo. Thought I'd send along a couple of pictures
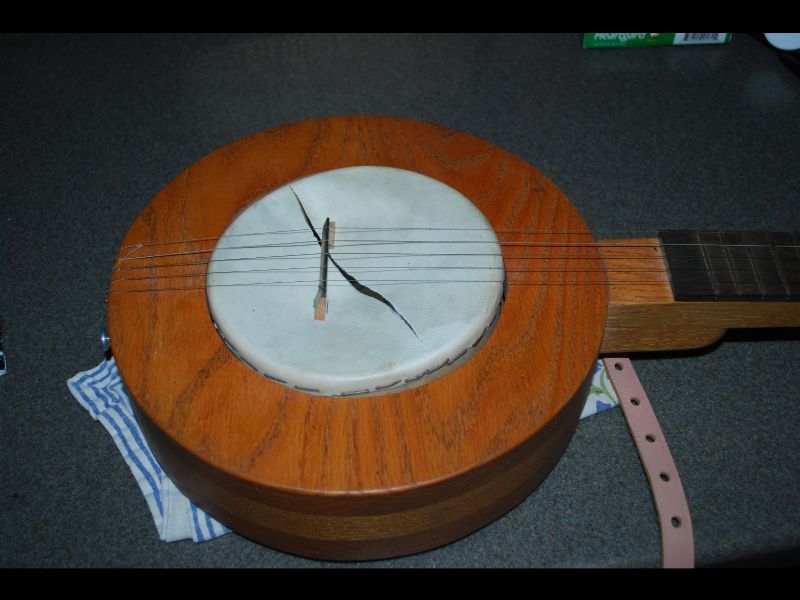 Banjo - Damage | 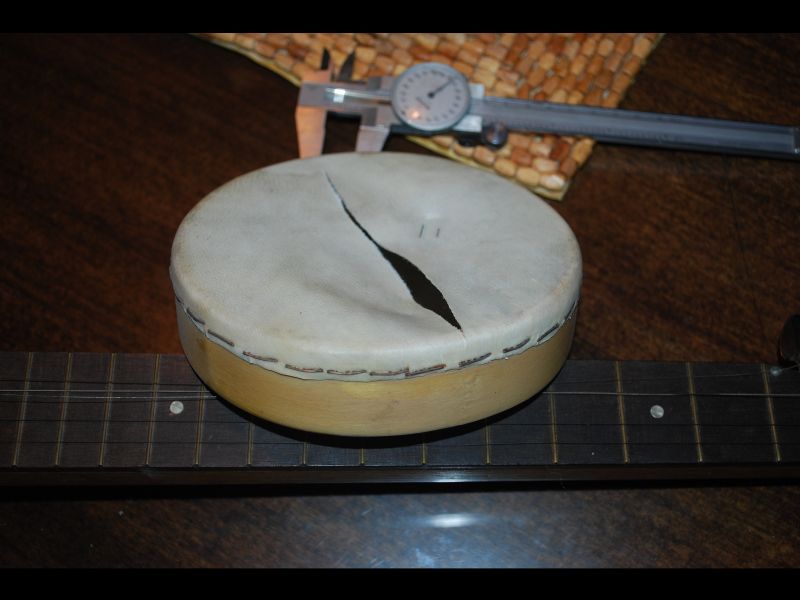 Head Close-up | 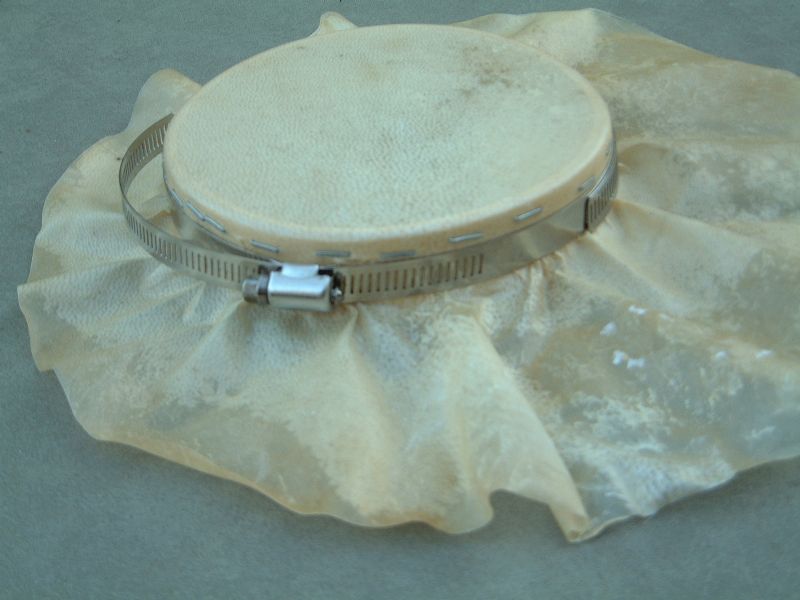 Head drying | 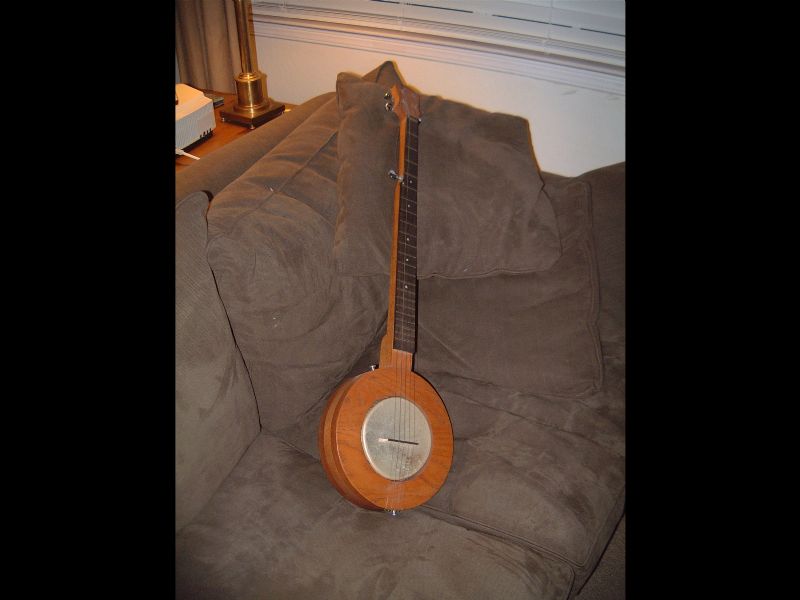 Carefully posed |
 Banjo - Head Shot |
Crowman - Posted - 09/04/2010: 18:01:46
Hey guys, quick question for you. I have some very nice black walnut planks that are from a flooring manufacturer and would like to use them for the rim on the mountain banjo. Having a hard time making my mind up on using pie pieces glued together or using blocks like a typical block rim. The planks are all scrap but beautiful wood. They 1/2 thick and range in widths from 4 to 6 inches. None are longer than about 3 feet. I am sure I can manage a nice rim top and bottom out of this scrap but would like to have ya'lls thoughts on it before going to the bandsaw. Thanks
MountainBanjo - Posted - 09/04/2010: 18:58:28
Somewhere up there are pictures of my last one which is laminated side to side yellow birch of about the same dimensions as your walnut. So yeah you can do it. But if I were you I would use the walnut for the neck too, if you have enough. If not I would still use it for the neck.
Craig - Posted - 09/04/2010: 19:19:57
If you're making a traditional mountain style (Foxfire plan) using this wood, I would make the top and bottom using two pieces each, and run the joint down the middle (neck to tailpiece). For strength it would be good to reinforce the joint with dowels using a dowel jig. These pieces are 1/2" thick and 10" in circumference, plus the neck extension, which would work out fine with the pieces you have.. For the 9" middle piece, do the same but double it to make it 1" thick. In this case, the two layers could be turned 90 degrees to each other for strength.
MountainBanjo - Posted - 09/04/2010: 20:35:48
I ran my top/back pieced perpendicular to what you suggest to avoid having to screw near the glue joint on the neck tabs.
Craig - Posted - 09/04/2010: 21:56:34
I thought it would look better in line with the neck, using two screws at both the neck and tail piece. I would double screw the joint either way and I don't think there would be a problem if it's predrilled. Obviously a single piece would be best.
by the way, instead of a band saw I made my circles with a router and a circle jig except I used a 4" hole saw on the back. I think all the circles are better than I could have done with a band saw. I also routed the middle piece to accept a plastic 6" bongo drum head. I initially had a pvc fitting inside but converted to aluminum as shown on page 7 (Bisbonian).
Crowman - Posted - 09/05/2010: 07:33:49
Thanks for the comments, and I have not even thought about doing it that way. I was making it harder than I needed to I guess. Well I do not own a router as they scare the blank out of me, dont know why but they do. I have a hand drum also that I am going to use that I mentioned way up there somewhere, so I will have to cut my circle for that. The neck may be a problem using the wood, as I do not know if I have enough pieces that will be long enough for the neck. Yes I am planning on building it just as Foxfire plans say, just using the hand drum in place of the tin and skin head. I am going to make a full size plan tomorrow and transfer it to my wood using spray glue and then give it shot, that is if I have enough wood to do it. Now that the weather is getting cooler, I can maybe get a few minutes in for the banjo. I would like to build one out of one piece of wood, but this one I would like to use the black walnut that I have if possible as it is some of the most dense hardest wood I have seen, and heavy as lead. I can only imagine what a floor made out of that stuff would weigh and cost?? I like folks keeping this thread alive as it is something that really interests me, and something that I think I could possibly do with my limited wood working skills. I really need to get out there and lay out the wood and see exactly what I have and then go from there on the plans.
Craig - Posted - 09/05/2010: 12:33:22
The neck is a whole different problem! My initial thought is to glue it perpendicularly to the top, and add a fretless finger board and headstock cap to hide the laminations when playing. It would of course be available for admirerers on the under side. At 1/2" width, it would take 5 pieces about 27" long and 4" wide to make a full blank. You could splice some shorter pieces in as needed. You should cut the profile first, then put it back together with a few drops of wood glue and then cut the top view.
Crowman - Posted - 09/05/2010: 15:47:33
Well I have went through the walnut and I do not have enough to make the neck or the rim without doing some major cutting and gluing. I had forgot exactly what I did have but now I guess I will have to make a block type rim if I use it at all. So many of the pieces are not matching color wise or grain wise that it may just be a total waste of time. I can use it to make other small pieces for sure, but the mountain banjo may have to wait till I go to home depot. I did find 2 very nice pieces about 10 x 12 but they are almost 1 inch thick and very heavy but the grain is very nice. Craig I really do not understand what you mean in the last post as reading it is not as easy for me as seeing it? I can get what I need at home depot as I have already been down there months ago before Dad got sick. Its just not easy for me to go as I need to be with him while I am not working, but I am off tomorrow and I can get him out of the house and go on a short trip and pick up what I need while we are out. I will let you know more tomorrow if I get to go down there. I did actually buy me a book for clawhammer as I have no idea how to play that style so I also got to learn that once I get one built lol.
Thanks
Craig - Posted - 09/05/2010: 17:47:09
I was just trying to figure out how I would make a neck by gluing up multiple pieces since you had said earlier you had some as long as 36". Sounds like that's now out of the question. But consider this:
1. Have the two 10 X 12 pieces planed to 1/2" for the top and bottom.
2. Make the middle section by gluing smaller pieces together to make a block about 10" square and 1" thick.
3. Cut the three pieces for the pot (outside and inside circles plus the tongues for connecting to the neck).
4. Make a neck. I made a prototype neck just for practice. You should find a nice piece of wood to reasonably match the pot and make another better neck.
As I said above, you should cut the profile first, then put it back together with a few drops of wood glue and then cut the top pattern.
There are a lot of resources available to learn clawhammer. Other threads will have that information. But I would add quickly to check out YouTube and especially Don Zepp's clear head video. Good luck!
rudy - Posted - 09/06/2010: 17:10:54
Hi All Mountain players,
Just a note to say I've added a quick MP3 on my homepage music "Warm Creek Chicken Strut" on the Mountain Banjo Fretless Nouveau. There's also a quick video here to demonstrate a bit of my technique:
youtube.com/watch?v=O1a9rlW8_s4
Crowman - Posted - 09/14/2010: 13:47:32
Well guys finally got around to starting my first mountain banjo. Got some poplar at the local store, glued it up and started cutting out the neck. One thing i know already is that I have more respect for banjo builders now, hey this is hard work :) I am learning as I go, making mistakes and learning from them. Learning how to use a hand plane, and that is an art in itself as I am learning. Got ears on the peghead now, waiting on glue to try to start on the peghead. I wanted to start with poplar for my first one and maybe walnut for the next one. This takes a lot of stress out of my tired body, gives me something constructive to do. Hey I maybe hooked on this building thing :) Thanks for all the posts, maybe will get some pics up if I can figure out how to load them.
Craig - Posted - 09/14/2010: 16:40:11
QUICK TIP: The best tool for shaping the neck is a draw plane or spoke shave. But I used a little 3 1/2" trim plane and it worked well. I don't recommend the Stanley. There is one that is cast (heavier) that is better. Mine has no name on it but it's blue and says "Made in USA". It has a one screw adjustment holding a single blade.
Crowman - Posted - 09/14/2010: 16:57:47
Well tools are limited here as I have no idea what's best. Since I have some stuff at my Dads and some at home it makes it hard. I do have the small stanley plane right now, its about 3 inches long with 1 inch blade. Its not working as well as I like, so what spoke shave do you recommend. Also the peghead has no dimensions on the pegs? Do you just even them out and center them? Also, can you recommend a tool for peg holes and making the pegs them selves? Thanks
Craig - Posted - 09/14/2010: 17:37:03
I have the Stanley too and it's not very good. The other one I have is about the same size, easier to hold, stays in adjustment, and cuts thin shavings. I used it on curly maple which is very hard wood. You should be able to find one without too much searching. I just found one at sears.com! It's called "Footprint Tools Trimming Plane" and sells for 9.99.
I don't have a spoke shave so I can't help you there. I patterned my peg holes after one of my other banjos and used geared pegs. I bought a reamer at Sears and cut it off for the 5th string peg hole. You can also buy them at Stew Mac for more money.
rudy - Posted - 09/15/2010: 06:46:32
Regarding neck profiling,
I've never had great success with a spokeshave or plane due to tear-out issues when planing in the opposite direction of the grain.
I would cut away excess using a saw then refine the shape using a good rasp. You can pick up a 3/4" round surform-type ramp inexpensively or pop for my preferance, a Microplane rasp. These are a little more money, but I've used mine a lot. Refine shapes with a 1" and 2" round sanding drum held in a portable drill.
If I'm using friction pegs, I go with commercially available violin pegs. The last batch I purchased were 80 cents each in bulk quantity.
If you go that route, save yourself a lot of work and get a regular peg reamer. They aren't cheap, I think mine was around $20 on sale from International Violin Supply.
Crowman - Posted - 09/15/2010: 09:14:44
Rudy thanks for the help, and yes I had some tear out issues on my first neck also. It hasn't been a big deal as the neck still had plenty of material left. I will have to find a good online vendor for some hand tools cause going out to buy them is just about impossible with my current situation. I have looked at some violin pegs on ebay and they are cheap in bulk like you said, but I wanted to make my own, but with my current tools and time that may not happen. I have some much to learn its hard to take it all in, I have always wanted to work with wood its just took me this long to get started. I like doing things by hand, cannot afford the machines and don't like the noise or the saw dust. Doing it all by hand is painfully slow though as I am finding out, that's why I finally bought a band saw. Thanks
Craig - Posted - 09/15/2010: 11:08:24
Rudy,
Shaping the neck took me a long time and still is a little too heavy. I take it you shape above and below the 5th string location and then blend them together. Is that right. What advice do you have for obtaining the desired shape and size?
rudy - Posted - 09/15/2010: 14:08:02
Craig,
The photo is one I snatched from my building guide CD. You can shape with a rasp any way that you choose. The neck shown was shaped by forming it to the shape of the neck contour at several intervals along the neck and blending them together. The flat area was left as a convientient way to hold the neck firmly in place with a C clamp while it is being rasped to shape. A close look of the photo shows the contour line still remaining just above the flat area.
The contour guide is available as a free pdf on my website. Go to bluestemstrings.com/pageBanjoC...ips1.html and scroll down to the "Shaping The Neck" section.
The contour guide looks like this, but the pdf prints out full size:
"Baseball Bat" necks are the norm for new builders until you get a feel for how to shape and contour. You can always remove more, it's much more difficult to put material back on!
Edited by - rudy on 09/15/2010 18:50:48
Crowman - Posted - 09/18/2010: 16:31:30
Well guys made some progress on my neck, took Rudy's advice and used a sanding drum in a handheld drill. It ain't perfect
but it is looking better and I am learning as I go. I have a question for the group, I am using a hand drum for the pot, and its 8". Do you think a 1 inch circle on the outside of it will be enough support since my pot is larger than the specs?
Thanks
Crowman - Posted - 09/26/2010: 16:23:16
Well its starting to look like a banjo finally.Still got a lot of work to do, but at least its together for the first time. This is the first banjo I have built and I guess its the first thing I ever built from wood other than some pine boxes? Sure made a lot of mistakes and sure I will make more before I finish it. I did not have the tools to build it and did way to much by hand but its been fun doing it and learning at the same time. Still have to drill for the violin pegs, stain and make a bridge and tailpiece, but its getting there. The popular looks awful white in the photo which is not good either but maybe you can see the thing good enough to see that I finally got around to building it!!!
Thanks guys and keep building
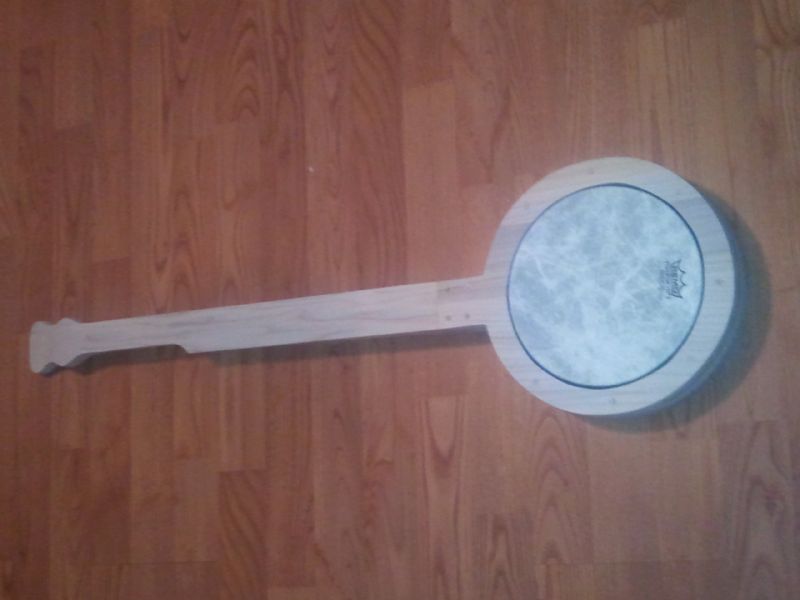 Mtn Banjo 1 |
Solo - Posted - 09/27/2010: 11:20:42
Looks great Crowman! When you get the strings on, you'll be one of the few and proud. Think of all the mojo you've infused in the wood, itching to contribute to your music.
Davidprat - Posted - 09/28/2010: 07:21:01
quote:
Originally posted by rudy
Here's a new Cherry top tension mountain banjo I just finished up. It features 24" scale, 11" pot with 9" Rennaisance head, top tension design, wood tone ring, Ebony pegs and fittings, mother of pearl inlay and position markers, flush fret scooped finger board, Nylgut Classical strings, combination block/laminate rim with contrasting trim, Wenge rear rim cap. Notice the fifth string peg has two holes to lock the string in place.
Here are a few more photos.
MountainBanjo - Posted - 09/28/2010: 19:20:03
Nice job Crowman, you're almost there. I did a 7 inch head on my last one and it worked fine.
rudy - Posted - 09/29/2010: 04:30:31
Crowman,
It's looking great! Take your time while fitting your pegs as it can make a big differance in how easy it will be to tune and how well it will hold pitch. The hand drum should work fine with your rim size.
David,
Thanks for the complement, I'm working toward an "ultimate" design, but I'm not there yet.
MountainBanjo - Posted - 09/29/2010: 06:42:44
How is your skin head tensioning banjo design coming along Rudy? 
Crowman - Posted - 09/29/2010: 06:51:02
Thanks for comments guys, but its far from what I wanted as my limited tools and time really kept me from getting the banjo like I wanted. one thing for sure, I am going to get a few items before starting the next walnut banjo. Rudy, the pegs were done yesterday, and with my dumb self trying every thing too get them to work without a reamer, needless to say it did not turn out perfect, but I hope it will work. I want to get your plans for your top tension design and try it next as your banjo is awesome. I would have not attempted this without the help of this thread, and I thank all of you for this information. Got to order some strings and a peg reamer now, also looking for a1 inch bench top sander. More pics to come later this week I hope.Thanks
Crowman - Posted - 10/09/2010: 17:42:01
Well finally got a finish on it and got some nylon strings on it. Got to do some polishing when finish cures good, but I guess I will move on now to a walnut banjo. This is my first banjo and boy did I learn what not to do  Maybe the next one will turn out better. Thanks for the thread guys and keep building mountain banjos.
Ronnie
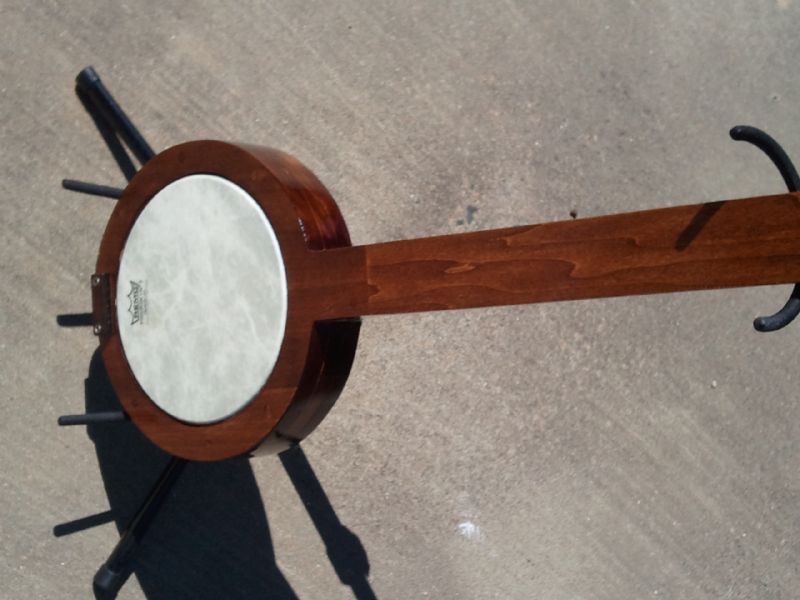 Mtn banjo 1 outside |
rudy - Posted - 10/10/2010: 06:07:55
Crowman,
Looks great! Don't underestimate the the improvement in sound you'll achive using Aqilla Nylgut strings, a lightweight bridge, and a Renassaince head. Those are three areas that I've found to make the biggest improvements in volume and tone.
Edited by - rudy on 10/10/2010 06:11:18
Crowman - Posted - 10/10/2010: 07:22:04
Thanks Rudy, I did order some nygut strings but right now I have the cheaper Lebella nylons on there. I was afraid that when I put tension on the strings that the neck would break like a piece of balsa wood lol. I am going to build another one out of black walnut and stick to the foxfire plans on it, this one is a little different due to the hand drum that I used. I am still going to get your plans and cd as I need the material cause I have been bitten by the building bug now. I want to build the next one using frets and a ebony fingerboard. I have one more hand drum to use for it and the remo fiberskin head sounds very good on it. What I like the most about the banjo is the weight, it is so much easier to play and hold than my bg banjo. The bg banjo was killing my back, and with my Dad being sick I didn't want to practice cause it was so loud, but this banjo sounds good and quite, perfect practice banjo. I appreciate your help and stay in touch. Would like to know how your doing on the top tension design?
rudy - Posted - 10/10/2010: 08:57:31
Crowman,
Keep up the good work! You will be amazed at the differance in tone and volume when moving frm the LaBellas to the Aquillas. It really is a night and day differance. I throw a set of Labellas on to check setup "in the white" before disassembly for finishing then do final assembly with Aqullas.
The top tension worked out well, and it can be seen on my posting about 1/2 way down on page 11 of this thread. It was recently sold in the classifieds and I'm off on my further quest in producing the "Ultimate Mountain Banjo"!
FScholle - Posted - 12/23/2010: 06:14:35
Reviving this thread. I have wanted to build one of these things for about two years. Finally negotiated some shop time with "she-who-must-be-obeyed" and got it done.
Pot is walnut, neck poplar, goat skin, aluminum hoop, scale is short, about 22 in. I did the neck attachment with some threaded brass nuts inserted so the neck can be attached with machine screws and easily taken off for travel without wearing out the wood.
I used a router with a homemade circle jig to cut the circles and that worked really well. All three layers of the pot are 3/4 in thick. Next time I would like to go to 1/2 top and bottom plates.
This thing was a blast to build and quick, too. I have a feeling that this won't have been last one I build.
Here's a quick video:
 VIDEO: Mountain banjo-Pretty little dog (click to view) |
rudy - Posted - 12/23/2010: 18:00:46
Hey, Frank!
You should be proud of what you've accomplished. That's a really nice Mtn Jo and sounds great. Play it for a while to see where you can make improvements and then start your next one.
flatfootjohnny - Posted - 01/12/2011: 09:41:48
Heres a couple of pics of my new mountain banjo. Its made from an old piano that i chopped up. I think the main wood is Poplar with a walnut veneer. I stained the poplar walnut colour then varnished it with polyurethane varnish (i wont be doing that again as im not to pleased with the finnish) The piano was about 90 years old and had a few knocks and dings in on the veneer which i left in place ... kind of gives it a sense of history.
I was amazed at the sound and now i cant put it down
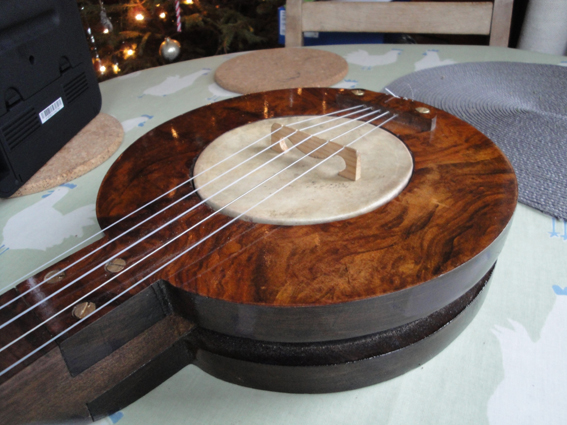 Mountain banjo | 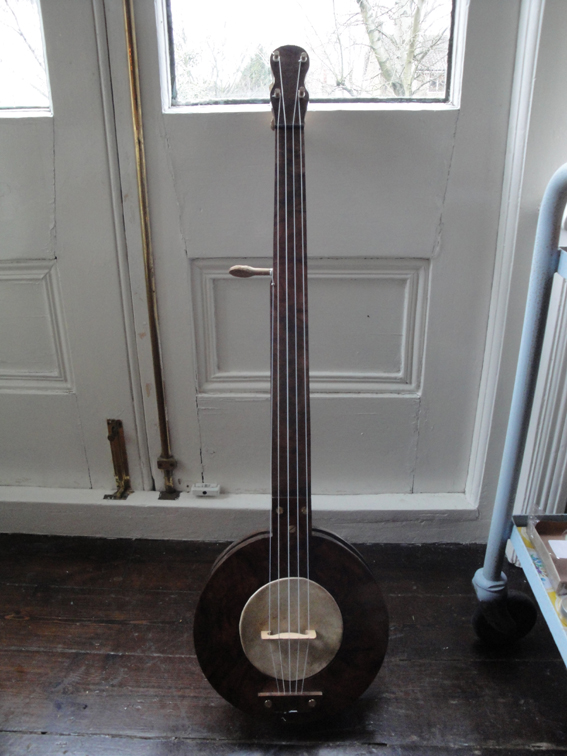 Mountain banjo |
kevinwholmes - Posted - 01/12/2011: 09:51:52
Very pretty John. I just posted a video of me playing (poorly) my fretless mountain banjo.
Terms of Use | Privacy Policy | Privacy Consent (EU/GDPR Only)
Copyright 2026 Banjo Hangout. All Rights Reserved.


